Robin Newman’s Lego© Mindstorms© Page A beginner’s journey 9
A belt-driven colour brick sorter
I recently came across download links for models developed for the 9695 Education Resources Set linked from http://www.homerobotics.ca/DOWNLOADS.html together with programs to run them.
I don’t have this set, but decided nevertheless to look at one of the models for a colour belt brick sorter. This used bits from both the 9695 and 9797 sets. I have the 8547 Nxt 2.0 set and the 9648 Education resource set plus one or two other bits, and with a little modification was able to build the model. I also modified the software developed for my own colour ball sorter models to produce an intelligent sorter for the belt brick sorter.
I constructed the model as per the build instructions here but made some changes to accommodate bits I didn’t have. In step 7 I didn’t have the required 5x7 liftarm (part 64179) so I replaced it with two 3x5 liftarms and a 1x5 beam which gave the same outline. See photos.
 replacement bits =>>
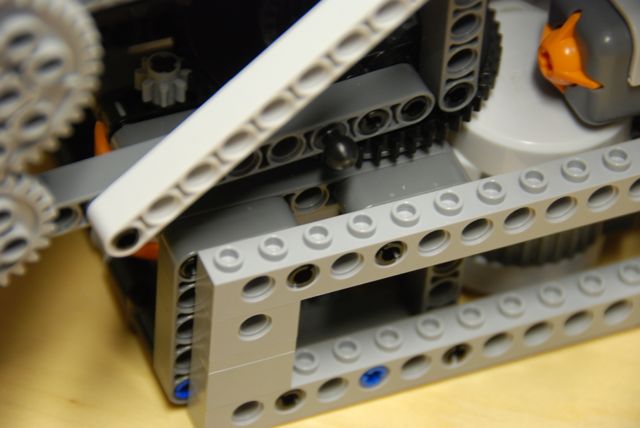
Similarly in step 19 a further two 3x5 liftarms and a 1x5 beam replaced the second 5x7 liftarm. These changes gave slightly less rigidity than the original, and this was compounded as the 1x9 beam added in step 21 had to be omitted as there were no holes to accommodate it. However, in practice it didn’t affect the overall finished structure which was perfectly rigid enough when completed.
Further views of the alternative 5x7 lift arms in place shown below.


Two other changes were made. I did not have enough 2x1 bricks for steps 34 and 35 so replaced four of them with 2x1 bricks with an axle hole. Secondly I did not have the 1x3 half thickness beams used in step 51 and 52. I replaced them with 1x5 half thickness beams which were adjusted in position so that the two empty holes in the 1x3 beams coincided with two empty holes in the 1x5beams. This enabled the runway to be correctly mounted in step 59. See photos below.
 and
and 
The final two pieces I was missing were in step 85 where I didn’t have the two 87082 long connector pins with centre hole. Instead I used a Techninc Pin 3L Double part 22136 and a Technic Pin long with Friction and Slot part 6558. See Photo.

Once the structure was completed as per the build instructions I made the following additions. I added a push sensor and a Technic Pin Connector Perpendicular 1 x 3 with 4 Pins on the frame just to the left of the Lego NXT brick and added a technic pin towball with friction to the bottom beam of the rotating arm. See photos.


This sensor was wired into input 2 on the NXT brick. Finally, to make it harder for bricks to jump the belt when the were pushed on to it by motor A, particularly when the arm was near right angles to the chute direction, I added two 1x7 beams secured by two technic beam 2 liftarm with hole and axle hole and a couple of technic axle pins with friction and two technic pins with friction and slots. See photo.

The program I developed can be downloaded from the file ColourBeltSorter.rbtx which contains the main ColourBeltSorter.rbt program and three MyBlocks called ColourBeltZeroChute, SayBeltColour and setbeltposition. Comments added to the program files indicate how they work. The only operational adjustment should be to ensure that the push arm driven by motor A which ejects the bricks from the chjute onto the belt is set correctly before the program starts. To do this, rotate the gearwheel at the back of the model so that the top of the push rod is just below the slide on the chute. It is a good idea to try out the model with a sequence of bricks corresponding to ascending colour numbers as detected buy the sensor. That is in order Blue, Green, Yellow, Red, Grey. (I didn’t have any white 2x2 bricks so I used light grey ones instead. These are detected as white by the sensor, but I cheated and changed the voice announcement to Grey in the program. If you want to use white bricks instead, you can modify the saycolour MyBlock to say White instead of Grey for number 6 detected. NB one quirk of the software is that it only appears to show 5 branches graphically, you have to force the 6th one by selecting it in the numeric list. You can then adjust the sound icon in the graphic window.
I haven’t had time to add screenshots of the program elements as per the other projects, but the programs have comments included which will let you see how they work.
I hope you enjoy playing with this model as I have.